3D Touch enhancements – Photoshop
Creating a mask for enhancements in Adobe Photoshop isn’t much more difficult than creating it in Adobe Illustrator. It’s only a little more complicated due to the more options offered by the program. All you have to do to complete the process successfully is to remember a few important things.
First of all, it’s worth knowing from the beginning what effect you want to achieve. The process is completed successfully when you come away with a file (or files) with points displaying a 100% K value. These areas should have defined contours with no blurring.
This time, we won’t go through the process of creating a cover from start to finish. We’ll move onto specifics right away. Let’s have a look at the tools used to create the effects shown in our booklet of enhancement samples. We’ll skip the workspace preparation phase for the cover design. Watch this video to find out how to do this.
We’re in for a wild ride!
1. Brush tool

Part of a cover – the layer to be printed
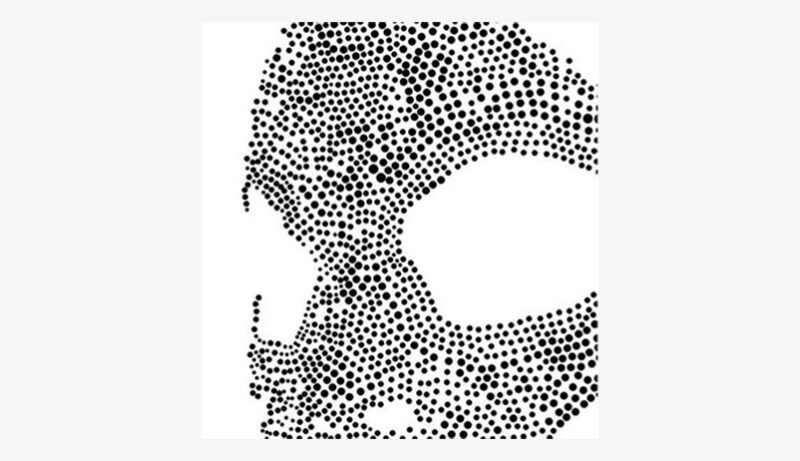
There possibly isn’t a more obvious method than “manual” filling in of the areas we want to enhance. To do this, choose hard brushes with a 100% K value. Working with brushes is neither the fastest nor the most precise way of achieving your objective. However, there are certain circumstances where you aren’t given a choice. A great example here is the cover created for “Dia de Muertos”

Part of a cover with 3D varnish applied.
Its beauty lies in the fact that the 3D varnish imitates the beads that make up the mask in the image. The beads could not be selected automatically (e.g. using the “select colour range” command or the “magic wand” tool) and then filled with black. They would “blend” to create a single blurry mass. So there’s nothing left to do other than the tedious placing of dots in the spots to be covered with the varnish. Contrary to popular belief, this isn’t too time-consuming. Plus the end result is well worth the time dedicated to it.

End result, i.e. a mask ready for application of 3D varnish
Naturally, we’re working within a separate layer to be later exported as a PDF.
2. Pen tool
Similarly as with the method above, it is a “manual” technique: you use the tool to trace the outline of the shape to be enhanced. Shapes are vector graphics, so you don’t have to worry about blurred edges. Make sure your filled shape displays a 100% K value.
3. Filters and thresholds
Graphic designers rarely visit the filter gallery. They might do it out of curiosity, at the beginning of their adventure working with Adobe Photoshop, to check out the options offered by the program. Later, they are treated as a useless novelty. Still, when designing 3D enhancements, filters are a true mercy. What do you do when you want to “extract” the texture of your graphics? Doing it using the pen tool is almost impossible; not to mention that it’s as tedious as attempting to free-form select a bunch of dill. With a bit of creativity, it’s just a few simple steps. First of all, copy the layer containing the graphics the texture of which you want to highlight. Then, if necessary, change it into black and white and increase the contrast – to a distorted level even, if necessary.
The next step is to use the filter gallery. The “sketch” section is where the most useful filters are, i.e. “stamp” and “chrome”. Naturally, if you find something that appeals to you more, go ahead and use it. But this isn’t all yet. Remember that your objective is to create a layer with points displaying a 100% K value.

Another example of challenging cover graphics
Choose the “image” option, then “adjustments” and select the “threshold” command. The “threshold” filter converts your images as to show the areas lighter than the threshold as white and the darker ones as black. As a result, we are left with a black and white layer.

A mask ready for application of 3D varnish
You determine the threshold level yourself. If you’re satisfied with the effect provided by this filter, and if necessary, you can now introduce some corrections manually. Don’t worry about the resulting shapes not being perfect. The varnish applied combined with your graphics will make a spectacular impression.

What do you have to keep in mind?
Adhere to the rules during your creative process. To obtain good results, you have to follow the technical recommendations to be found in our guide in the section entitled “3D Touch enhancements”.
Is this all Adobe Photoshop has to offer with regard to enhancements?
Absolutely not. These are just the basics. They’re a good start as far as the 3D Touch technology is concerned. As you become more experienced, you’ll develop your own techniques to achieve the desired effect. After all, practice makes perfect, and perfection in this case translates into breath-taking book covers.